 When I was young my Mom always made a delicious pudding dessert for the holidays. It was made with Jell-o pudding, Cool Whip and it had a buttery/flour crust (all food products I’ve chosen to no longer consume). On my journey to good health, I try to avoid dairy products, gluten and processed foods. That means all the foods I grew up on are no longer an option.
I’ve been experimenting with raw, gluten free and dairy free desserts. After I came across a recipe for a raw chocolate pudding in Whole Living magazine, I dreamed of that tasty pudding dessert my Mom use to make and I couldn’t wait to throw it together. My aunts use to call it "Better than Sex Cake" and "Sex in a Pan"...that's how awesome it was.
My natural version is even more amazing. The pie is named after the combination of chocolate and avocado: Chocolacado. Some people are thrown off by the avocados in the ingredient list. Don't worry, avocados have a mild flavor that are easily masked by the chocolate and honey. When blended, the avocados make a creamy texture, like pudding. If you're worried your kids won't eat it, don't tell them it has avocados - at least until after they've tried it.
Coconut milk makes an excellent replacement for whip cream. It doesn't separate when stored in the fridge like dairy whip cream, it's a lot healthier and tastier than cool whip.
This dessert can be made for those following a raw food, vegan, gluten free and even a paleo diet.
Chocolacado Pie Ingredient List
1 can of coconut milk (cold, stored in fridge over night)
2 teaspoons of vanilla extract
¼ cup and 1-2 tablespoons of raw honey
2 cups walnuts
2 tablespoons ground flax (hemp hearts work well too)
6 tablespoons of cocoa power
Pinch of Himalayan salt
Dark chocolate bar or unsweetened coconut flake for topping (optional)
METHOD:
Coconut Whip Cream
With a mixer whip:
1 cold can of coconut milk (use the entire can)
Whip for 5 minutes or until light and fluffy.
Add 1 tsp of vanilla and 1-2 tablespoons of honey.
Whip again – makes 4 cups
Place whip cream in the fridge until ready to use.
Crust
In a food processor, combine:
2 cups walnuts
1 cup dates
2 tablespoons ground flax
1 tablespoon coconut oil
Mix until dough consistency
Press dough into square pyrex dish or round cake pan.
Store in fridge until ready to use.
Chocolate Pudding:
In a food processor, combine:
3 avocados (slice in half, remove pit, scrape out avocado)
¼ cup honey
6 tablespoons of cocoa power
1 teaspoon of vanilla
Blend until pudding consistency.
Add 1 cup coconut whip cream.
Sprinkle with Himalayan salt.
Blend again until mixed.
Taste - if you can taste any avocado, add a small splash of vanilla, a tablespoon of honey and a little more cocoa powder. Blend again.
Put it all together:
Smooth chocolate pudding over the crust. It should create a layer about 1 inch thick.
Smooth remaining coconut whip cream on top.
Top with grated dark chocolate, chopped walnuts or unsweetened coconut flakes
Store in the fridge until ready to use. I recommend letting it set-up in the fridge for a couple of hours before serving or the coconut whip cream may be a little too watery.
For step by step detailed instructions, see the photos and steps below.
Step by step instructions:
Before you gather your ingredients, place the bowl you'll be using to make your coconut whip cream in the freezer. Use a stainless steel bowl if you have one and keep it in the freezer for 5 minutes.
Ingredients:
3 Avocados (plus one extra just in case one is not ripe enough or one has gone bad)
1/4 Honey and 1-2 Tablespoons (make sure you buy real honey, not that high fructose corn syrup stuff some brands and conventional grocery stores try to pass off as honey). You could also try maple syrup in place of honey.
6 tablespoons cocoa powder
2 cups walnuts
3 tsp vanilla extract
1 can coconut milk (regular not light) - must be cold
1 cup pitted dates
Missing from photo:
2 tablespoons ground flax seed
1 tablespoon Coconut oil
Pinch of Himalayan salt
TIP: Purchase full fat coconut milk that does not have any added ingredients. I recommend Whole Foods brand. Do not use Light coconut milk – it will be too watery. Make sure to store in the fridge overnight.
Prepare Coconut Whip Cream
1. Remove your can of coconut milk from the fridge and your bowl from the freezer. If you've used a good quality coconut milk, when you open the can, it should look like this - very thick. Scoop the contents into your bowl.
NOTE: If making a thicker whip cream, you would just use the cream and not use any of the water. Tip: Open can upside down so you can pour out the coconut water from underneath the thick coconut cream.
 For this recipe, I always use the whole can - both the cream and the water. The pie will thicken in the fridge. If you'll be serving this immediately, I would recommend, reserving some of the water for a thicker cream.
I always keep a few cans in the fridge, just in case you need to whip up some cream.
For this recipe, I always use the whole can - both the cream and the water. The pie will thicken in the fridge. If you'll be serving this immediately, I would recommend, reserving some of the water for a thicker cream.
I always keep a few cans in the fridge, just in case you need to whip up some cream.
2. Mix on high until it fluffs up - about 5 minutes.
3. Add 1 teaspoons of vanilla extract and 2 tablespoons of honey. Mix again.
4. Place bowl of whip cream in the fridge.
 Prepare Crust
This is a gluten free, raw and vegan crust.
5. In a food processor add: 2 cups of walnuts, 1 cup of pitted dates, 2 tablespoons of ground flax seed (or hemp hearts) and 1 tablespoon of coconut oil.
If your food processor starts to jump around or it doesn't sound right, there may be a date pit stuck on the blade. Stop the processor and look for a pit. Then continue until you reached the desired consistency. (It happens every time I process dates)
6. Process until it becomes doughy. After it turns into a dough, I like to add a few more walnuts and pulse....I like the chunks of nuts.
 7. Next place your dough in a square pyrex dish, a deep pie pan or a cake pan. For this dish I used a round cake pan.
Make sure you do not use a shallow pie tin.
8. Press dough in pan to make a crust.
9. Place pan in the fridge until you are ready to fill it.
 Prepare Chocolate Pudding
Avocados must be perfectly ripe or a little overly ripe is okay. If they are overly ripe, make sure they do not taste bad. To ripen avocados, place in a brown paper bag until ripe. (This may take a few days but it will be quicker than just leaving them in the pantry or on the counter.
I always buy an extra avocado just in case one goes bad.
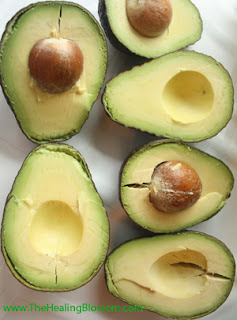
10. Rinse your avocados, then slice in half.
11. To remove the pit, use a large knife. BE VERY CAREFUL. Just hit the pit in the middle with the knife. See photo.
If the avocados are ripe, the pits will slide right out.
12. Next scoop the avocados out with a large spoon into the food processor.
13. Add 1/4 cup of honey, 6 tablespoons of cocoa powder and 1 teaspoon of vanilla.

14. Blend until smooth like pudding.
15. Add 1 cup of coconut whip cream, pinch of Himalayan salt and blend again until mixed.
16. Remove the crust from the fridge and add the pudding on top.
17. Smooth the pudding creating a thick layer.
18. Remove the coconut whip cream from the fridge and smooth a layer on top of the pudding.
19. Grate some chocolate or add some chopped walnuts or flaked coconut to the top.
20. Store in the fridge until ready to serve.
Immediately after I made the pie, I scooped this slice out. It did not have time to set-up in the fridge so it's a little watery. It still tastes delicious, but it looks better if the cream has had time to set-up in the fridge for a couple of hours.
I recommend serving the same day but it can be stored in the fridge for a few days.
Enjoy!!!
HAPPY HOLIDAYS!


 The ingredients are simple, if you want to make these cookies, here's your shopping list:
 Tip: I melt the butter first - or at least make sure it's room temp. Make sure you use REAL butter - not that stuff made from oil that looks like butter. Get the real stuff. 1 stick of butter is equal to 1/2 cup or 1/4 lb. of butter. I usually put my butter in a glass bowl and set it on the stove or in the oven its already warm, I don't use a microwave.
 Pre-measure your oats and vanilla before you start cooking. This will save you time and hopefully avoid over cooking (remember it will continue to cook after you've removed it from heat so it's best to have the oats, vanilla, and anything else you want to add all ready to go.


